
Operation Instructions for Updating AFHDS3 (RF Library) Firmware
Contents
1. Overview of Receiver Update (Reading Required) 2
2. Update Steps for each Receiver 3
3. Steps of Updating the Receiver through the Flysky Assistant 14
4. Steps of Updating the Receiver through the Receiver Updater 17
6. Flysky Official Platform Account 19
1. Overview of Receiver Update (Reading Required)
The RF systems of Flysky AFHDS3 series products have been upgraded to version 3.0. If your transmitter (including RF module) fails to bind with the receiver, you can perform the upgrade or rollback of the RF library by referencing to the tutorial.
You can perform the upgrade in three modes: Mode 1: Receiver firmware update package delivered in the transmitter; Mode 2: Flysky Assistant; Mode 3: Receiver updater. For the standard receiver of the transmitter, Mode 1 is recommended. For a non-factory standard receiver, Mode 2 is recommended (Flysky Assistant). For users who cannot register in Flysky Assistant, Mode 3 is recommended. The effects of the 3 update modes are the same.
The software version matching relationship between the transmitter and the receiver is as follows:

Figure 1.1 Firmware mapping relationship between transmitter and receiver
Note:
1、The firmware version of the receiver in this table is the latest version provided by Flysky Assistant 3.0 and receiver updater, at present. Except for versions in this table, other firmware versions can be used normally by users if receivers can bind with transmitters.
2、The green background is RF system version 3.0, and the yellow background is RF system version 2.0.
2. Update Steps for each Receiver
This tutorial adopts the method of mandatory receiver update. The mandatory update mode does not require a binding state between the receiver and transmitter.
To perform the mandatory receiver update, do as follows: Step 1: Operate the receiver and enter the mandatory update state. Step 2: Update the receiver firmware through the transmitter, receiver updater or Flysky Assistant 3.0.
The built-in receiver firmware information of the transmitter is as follows:


Figure 2.1 Built-in receiver firmware information of each transmitter version
2.1 Classic Receiver
2.1.1 FTr10
Step 1: Operate the receiver and enter the mandatory update mode. Connect the binding cables according to the figure below and power on the receiver. If the receiver LED flashes three times and goes out once, it indicates the firmware is in the update mode.


Step 2: Use the transmitter PL18, PL18EV or any AFHDS3 to connect the Flysky Assistant or receiver updater for firmware update. For operation details of the Flysky Assistant and receiver updater, see chapters 3 and 4.
2.1.2 FTr16S
Step 1: Operate the receiver and enter the mandatory update mode. Use tweezers or other tools to short circuit the "Mandatory update contact" and "GND test point" to power on the receiver at the same time. If the receiver LED flashes red and green slowly, it indicates the firmware is in the update mode.


Step 2: Use the transmitter PL18, PL18EV or any AFHDS3 to connect the Flysky Assistant or receiver updater for firmware update. For operation details of the Flysky Assistant and receiver updater, see chapters 3 and 4.
Note: In the update process, the LED flashes fast red and green. After the update is complete, the LED flashes slowly red.
2.1.3 FTr4
Step 1: Operate the receiver and enter the mandatory update mode. Connect the binding cables according to the figure below and power on the receiver. If the receiver LED flashes three times and goes out once, it indicates the firmware is in the update mode.

Step 2: Use the transmitter PL18EV or any AFHDS3 transmitter to connect to the Flysky Assistant or receiver updater for firmware update. For operation details of the Flysky Assistant and receiver updater, see chapters 3 and 4.
2.1.4 FGr4
Step 1: Operate the receiver and enter the mandatory update mode. Connect the binding cables according to the figure below and power on the receiver. If the receiver LED flashes three times and goes out once, it indicates the firmware is in the update mode.


Step 2: Use the transmitter NB4、Noble pro、PL18EV or any AFHDS3 to connect the Flysky Assistant or receiver updater for firmware update. For operation details of the Flysky Assistant and receiver updater, see chapters 3 and 4.
2.1.5 FGr4S
Step 1: Operate the receiver and enter the mandatory update mode. Connect the binding cables according to the figure below and power on the receiver. If the receiver LED flashes three times and goes out once, it indicates the firmware is in the update mode.

Step 2: Use the transmitter NB4、Noble pro、PL18EV or any AFHDS3 to connect the Flysky Assistant or receiver updater for firmware update. For operation details of the Flysky Assistant and receiver updater, see chapters 3 and 4.
2.1.6 FGr4P
Step 1: Operate the receiver and enter the mandatory update mode. Connect the binding cables according to the figure below and power on the receiver. If the receiver LED flashes three times and goes out once, it indicates the firmware is in the update mode.


Step 2: Use the transmitter NB4、Noble pro、PL18EV or any AFHDS3 to connect the Flysky Assistant or receiver updater for firmware update. For operation details of the Flysky Assistant and receiver updater, see chapters 3 and 4.
2.2 Enhanced Receiver
2.2.1 FS-MiniZRF3
Step 1: Operate the receiver and enter the mandatory update mode. Press and hold the receiver bind key, and power on the receiver. Continue to press and hold for 10 seconds after powering up. If the receiver LED flashes three times and goes out once, it indicates the firmware is in the update mode.

Step 2: Use the transmitter NB4、NB4 pro or any AFHDS3 to connect the Flysky Assistant or receiver updater for firmware update. For operation details of the Flysky Assistant and receiver updater, see chapters 3 and 4.
Note: When you use the transmitter to update the MiniRF3 receiver, you need to switch the RF standard under RF settings to "Mini-Z (EVO)" first.
2.2.2 GMR
Step 1: Operate the receiver and enter the mandatory update mode. Press and hold the receiver bind key, and power on the receiver. Continue to press and hold for 10 seconds after powering up. If the receiver LED flashes three times and goes out once, it indicates the firmware is in the update mode.

Step 2: Use any AFHDS3 transmitter to connect to the Flysky Assistant or receiver updater for firmware update. For operation details of the Flysky Assistant and receiver updater, see chapters 3 and 4.
Note: GMR does not support the ARFDS3 transmitter to update firmware directly. You need to use the Flysky Assistant 3.0 or receiver updater.
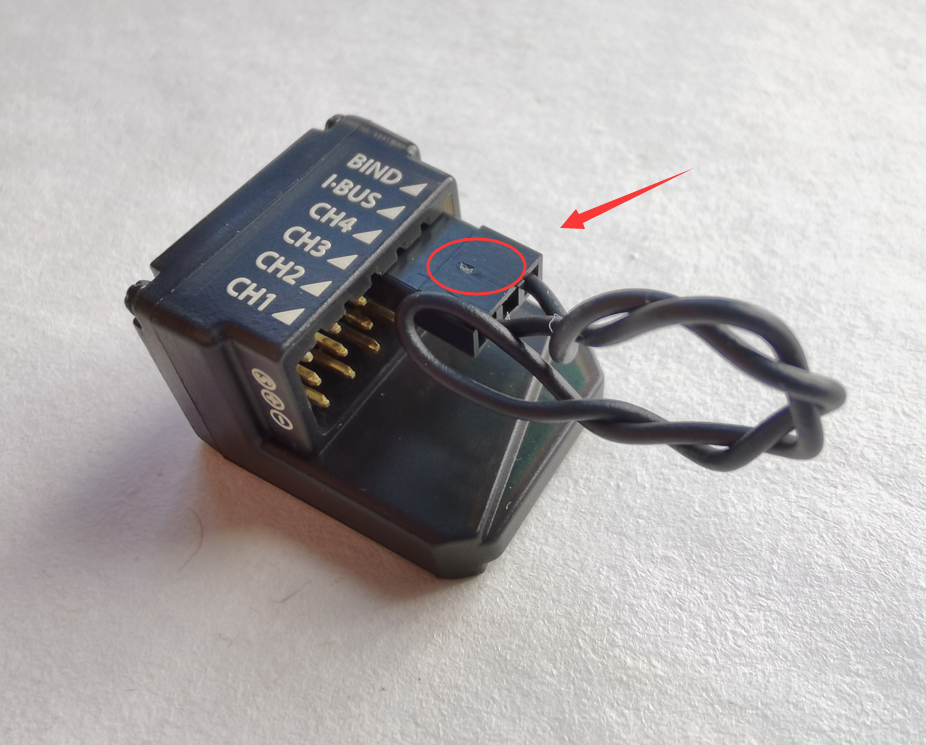
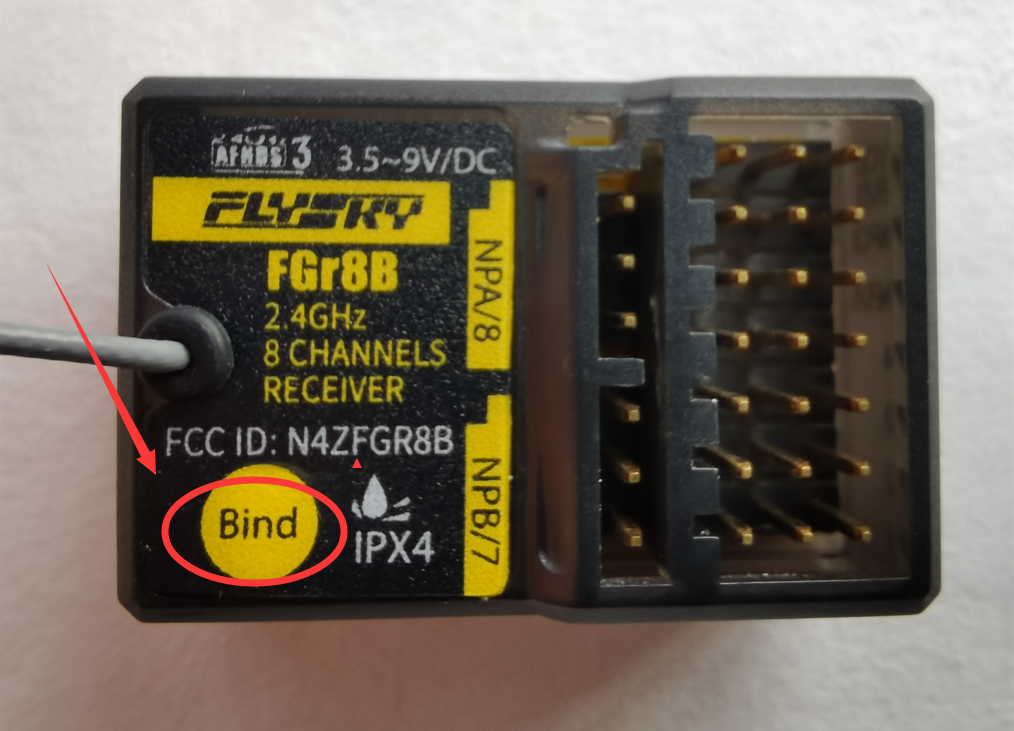
2.2.3 FGr8B
Step 1: Operate the receiver and enter the mandatory update mode. Press and hold the receiver bind key, and power on the receiver. Continue to press and hold for 10 seconds after powering up. If the receiver LED flashes three times and goes out once, it indicates the firmware is in the update mode.
Step 2: Use the transmitter NB4、Noble pro 、PL18 EVor any AFHDS3 to connect the Flysky Assistant or receiver updater for firmware update. For operation details of the Flysky Assistant and receiver updater, see chapters 3 and 4.
2.2.4 FTr8B
Step 1: Operate the receiver and enter the mandatory update mode. Press and hold the receiver bind key, and power on the receiver. Continue to press and hold for 10 seconds after powering up. If the receiver LED flashes three times and goes out once, it indicates the firmware is in the update mode.

Step 2: Use the transmitter PL18、PL18 EV or any AFHDS3 to connect the Flysky Assistant or receiver updater for firmware update. For operation details of the Flysky Assistant and receiver updater, see chapters 3 and 4.
2.2.5 FGr12B
Step 1: Operate the receiver and enter the mandatory update mode. Press and hold the receiver bind key, and power on the receiver. Continue to press and hold for 10 seconds after powering up. If the receiver LED flashes three times and goes out once, it indicates the firmware is in the update mode.

Step 2: Use the transmitter NB4、NB4 pro、PL18 EV or any AFHDS3 to connect the Flysky Assistant or receiver updater for firmware update. For operation details of the Flysky Assistant and receiver updater, see chapters 3 and 4.
2.2.6 FTr12B
Step 1: Operate the receiver and enter the mandatory update mode. Press and hold the receiver bind key, and power on the receiver. Continue to press and hold for 10 seconds after powering up. If the receiver LED flashes three times and goes out once, it indicates the firmware is in the update mode.

Step 2: Use the transmitter PL18 or any AFHDS3 to connect the Flysky Assistant or receiver updater for firmware update. For operation details of the Flysky Assistant and receiver updater, see chapters 3 and 4.
2.2.7 TMR
Step 1: Operate the receiver and enter the mandatory update mode. Press and hold the receiver bind key, and power on the receiver. Continue to press and hold for 10 seconds after powering up. If the receiver LED flashes three times and goes out once, it indicates the firmware is in the update mode.

Step 2: Use any AFHDS3 transmitter to connect to the Flysky Assistant or receiver updater for firmware update. For operation details of the Flysky Assistant and receiver updater, see chapters 3 and 4.
Note: TMR does not support the ARFDS3 transmitter to update firmware directly. You need to use the Flysky Assistant 3.0 or receiver updater.
3. Steps of Updating the Receiver through the Flysky Assistant
Step 1: After completing the first step to operate the receiver and make sure that the receiver has entered the mandatory update state.
Step 2: Connect the transmitter to the computer. Take PL18 as an example.
Step 3: Start the Flysky Assistant 3.0 (downloaded from the Flysky official website). Users need to complete account registration.

Figure 3.1 Homepage of Flysky Assistant
Step 4: On the right of the "receiver" information box, click the red box in Figure 3.2 to enter the "Firmware update interface". If PL18 is connected to the receiver, receiver information will be displayed.

Figure 3.2 Key update information page
Step 5: Click "Bind/Mandatory Update". The prompt box appears. Click "Mandatory Update" in the prompt box, and select the receiver firmware.

Figure 3.3 Receiver mandatory update
Step 6: In the "Firmware list", select the corresponding receiver. The version name with “New” at the end means the receiver is currently the latest version. Make sure the receiver is in mandatory update. Click "OK”. Wait for completion of the update. Take FGR12B as an example.

Figure 3.4 Receiver firmware list

Figure 3.5 Receiver firmware update

Figure 3.6 Receiver firmware update completed
Note: ① In the update process, make sure the receiver does not power off.
②After the update is completed, unplug the receiver bind cable. Otherwise, the receiver will continue to enter the mandatory update state when it is re-powered.
③It is recommended to use the original USB cable of the transmitter. The aforementioned three points apply to Modes 2 and 3.
4. Steps of Updating the Receiver through the Receiver Updater
Step 1: After completing the first step to operate the receiver and make sure that the receiver has entered the mandatory update state.
Step 2: Start the AFHDS3 transmitter to connect to the computer. Double-click to run the receiver updater. The receiver updater will prompt "USB connected successfully".

Figure 4.1 Connect to the computer through the USB cable
Step 3: Start the receiver updater. Select the corresponding receiver. Click Update. Wait for completion of the update. You can download the receiver updater from Flysky website.

Figure 4.2 Update progress indication

Figure 4.3 Update success indication
Note: ① Connect to computer directly after the transmitter is turned on. You do no need to set the transmitter to firmware update mode.
② Upgrade the firmware in the receiver updater to RF library 3.0 and downgrade the firmware in the receiver updater to RF library 2.0.
5. FAQs
5.1 Under what circumstances do I need to update the receiver?
l The receiver needs to be updated when the transmitter and receiver RF system are updated as a whole.
l You may need to update the receiver if a newly bought receiver cannot bind with the transmitter.
5.2 How to determine whether the receiver is in the mandatory update mode?
According to the receiver's manual, except for the FTr16S (LED flashing slowing red and green), most AFHDS3 receivers enter the mandatory update mode with LED flashing three times and going off once.
5.3 Which firmware version needs to be selected to update the receiver?
Users can select corresponding firmware by referencing the Firmware mapping relationship between transmitter and receiver.
5.4 How to determine whether the receiver is updated successfully?
In three modes (Mode 1: Receiver firmware update package delivered in the transmitter; Mode 2: Flysky Assistant; and Mode 3: Receiver updater), if the system prompts firmware update success and receiver can bind with the transmitter with matched firmware version (see Figure 1.1), the update is successful.
5.5 What should I do if the receiver enters the update mode again after the transmitter shows successful update?
For classic receivers such as FTr10, FTr4, FGr4, FGr4S, and FGr4P, the system will enter mandatory update mode again if the bind cable is not unplugged; at this time, the firmware has been updated and can be used normally. Several other receivers may enter the firmware update state again after the first firmware update is successful; at this time, you need to wait for the second update to be completed.
5.6 What should I do if the receiver fails to bind with the transmitter after the receiver update is completed?
Check whether the selected binding mode is correct. Make sure there are enhanced receivers (Fast 8ch, Lora 12ch, and Routine 18ch) and classic receiver (classic 18ch). Verify the firmware version is matched (see Figure 1.1). You can update the receiver again.
5.7 What should I do if the update in the transmitter/Flysky Assistant/receiver updater mode fails?
l Check whether the selected receiver model is correct.
l Confirm whether the receiver has entered the mandatory update mode (See 5.2).
l Try to update the receiver again or switch to a different transmitter for updating.
5.8 What should I do if the receiver fails to enter the mandatory update mode?
l Check whether the receiver model is correct (See Chapter 2), for example, incorrect connection of the binding cable of the classic receiver, it may be loose in the 10-second key pressing process.
l If the receiver fails to enter the update mode due to a functional fault such as short circuit of the receiver, you can contact to the seller or Flysky (email address: flyskyrc@flysky-cn.net) for after-sale service troubleshooting.
5.9 What should I do if the transmitter firmware version is too early to support the mode through the Flysky Assistant or receiver updater?
You can update the transmitter to the latest version with the firmware update package on Flysky official website.
